Showing posts with label Basil. Show all posts

Wednesday, October 5, 2011

Crocktober: Marinara Sauce from the Crock Pot

Even though this is only the second recipe of Crocktober, I'm gonna go ahead and declare this the absolute easiest crock pot recipe on the planet. Okay, there is that extra thing where you have to boil pasta, but you can make a very yummy home-made sauce while you're not even at home. I think that's pretty cool.

Sometime last winter, I called my (Italian-American) Dad to brag about having made my very first meat sauce. He was mildly impressed, but I was super impressed, because to me pasta sauce is a basic necessity vital for the survival of the human race. Perhaps this is a slight exaggeration, but I defy you to find a person who does not, or has never enjoyed spaghetti in a red sauce. You can't. They don't exist.

I used fresh parsley and basil with dried oregano, but you could use all dried herbs or all fresh. With the fresh herbs, add them just before serving. Subject them to all-day cooking and they will lose their oomph, and possibly disintegrate. Also, if you're anything like me, it might seem like a good idea to chop the herbs ahead of time so you can just toss them in the crock when you get home, but resist the urge. The flavor will be much more fresh if you wait, and premature chopping generally leads to browned leaves, which is just sad.

This recipe makes about 3-4 servings. (I'm a hungry person, generally, so I never know for sure what other people consider a serving to be).


Ingredients:
1 1-lb., 12 oz. can crushed tomatoes
1 6 oz. can tomato paste
1/2 cup fresh basil leaves (lightly packed), chopped
1/2 cup fresh parsley leaves (lightly packed), chopped
1 tsp dried Italian herbs (using the fresh ones above, this is optional but recommended)
1/2 cup vegetable broth or stock
1 tsp salt
1/4 tsp ground black pepper
2 cloves garlic, smashed 
1 cup onion, diced
Grated Parmesan or Pecorino Romano cheese for serving (optional)

Directions:
1. Combine all ingredients except for the fresh herbs and cheese in a 2-5 qt crock pot. Cover and cook on low 8-10 hours or high for 4-6 hours.
2. Add the fresh basil and parsley.
3. Serve (generously) over fresh, hot pasta (avoiding the garlic) and sprinkle with Parmesan or grated Pecorino Romano cheese.
4. Gleefully slurp your spaghetti.

My lens got a little steamy there on the left
This recipe is a good base for an arrabbiata sauce. Just add red pepper flakes, cayenne pepper, a whole dried chile, Sriracha or whatever you like to use to heat things up. 

While I don't know the "rules" of marinara, I do know that you could add celery, carrots, or mushrooms to this sauce if you felt compelled. Celery and carrots are hearty enough to withstand all-day cooking, so it's one-step and you'll get lots of delicious flavor mingling. (Mushrooms are a little more delicate and should probably only cook about half that long). The only rule I do know is that since marinara is relatively thin in texture (compared to, say, a lamb ragu) it should be enjoyed with spaghetti, so save the tube-and-trumped-shaped pasta for the trapping of thick sauce, meat and veggies.

 P.s. If you're in a pinch and don't have the time to make your sauce, Bon Appetit recently did a blind taste test of store-bought tomato sauces, and Barilla Traditional Marinara came out on top.

Sunday, August 28, 2011

Quinoa & Bean Salad with Basil & Lemon

While she turned out to be a great big nothing in West Philadelphia (a little heavy rain and one windy day), Hurricane Irene was a weirdly grown-up experience for me. Getting ready for a potentially major weather event on my own between cautionary text messages from my Mom, I had many a flashback to my parents' old black GE radio, rummaging around for candles, and the excitement of when the power would go out. Though I know now that storms were surely less exciting for my parents, who were no doubt concerned with things like food spoilage and water supply, I have lots of fond memories of weathering storms with my family as a kid. On my own, though, the whole thing seemed a bit less fun.

Though quinoa is only non-perishable in its uncooked form, this seemed like a reasonable electric-free dinner recipe for pre-cooked quinoa. And even if you were to lose power, it would stay fresh for a while in your refrigerator for a while as long as you don't go around leaving the door open all willy-nilly.
This makes about 3-4 side-dish servings, or about 2 vegan main dishes.

Ingredients:
1 cup cooked quinoa (a little over 1/3 cup raw)
1/2 cup chickpeas or other beans, thoroughly cooked
1/2 red onion, finely chopped
1 bunch basil, stems removed and leaves chopped
Olive oil
Salt & pepper
Juice of 1 lemon

Directions:
1. In a large bowl, whisk together about 2 tbsp olive oil and the lemon juice and season with salt and pepper.
2. Add quinoa, chickpeas, onion and basil and mix well.
Feta optional
This salad is simple, fresh, delicious and nutritious, and a great make-ahead meal. For a little more color you might prefer to use kidney beans, navy beans, or something else that isn't coming to mind at the moment. And, while I love the simplicity of this salad, you could add just about any fresh veggies that you have on hand - cucumber, summer squash, or fresh corn, for example. Because I'm a slight carboholic, I had mine with a warmed, buttered naan-type bread and threw in a little stray Feta, but without these additions, this meal is vegan and gluten-free, and perfect for a summer lunch. Yum!


Quote of the Day: Red onions are especially divine. I hold a slice up to the singlight pouring in through the kitchen window, and it glows like a fine piece of antique glass. Cool watery-white with layers delicately edged with imperial purple...strong, humble, peaceful...with that fiery nub of spring green at the center. ~ Mary Hayes Grieco, The Kitchen Mystic

Thursday, July 21, 2011

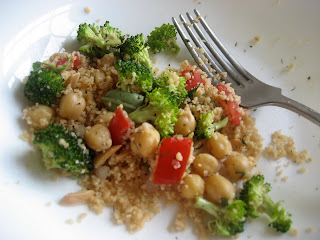
Couscous with Veggies, Chickpeas, Toasted Almonds, Herbs & A Little Spice

We are in the midst of a very ugly heat wave here in Philadelphia, which I will not bore you with the details of. Except that it is ugly, I am too hot, and I don't want to talk about it. Except to say that I would pay double the value of my student loans for a freak July blizzard. Which is a lot. Moving on.

They (the internet) tell me that whole-wheat couscous is popular amongst the vegetarian set, which I guess shouldn't really surprise me. It's easy to prepare, versatile in its seasoning potential, and can be loaded up with a ton of veggies and beans for a delicious complete-protein meal. So here is the version that I came up with tonight. I got a bit cavalier with combining flavors, so measurements are approximate:

Ingredients:
"2 servings" of whole wheat couscous; 3/4 cup before cooking
1 1/2 cups broccoli florets, cut small
1 1/2 cups chickpeas, canned and thoroughly rinsed or fully cooked
2 plum tomatoes, diced and seeded
2-3 good pinches paprika, to taste
2 teaspoons dried dill
1 tablespoon lemon juice, white wine vinegar or jarring juice from queen olives or something similar. (I used the juice from a jar of pepperoncini, which worked great.)
1-2 tablespoons dried parsley, or about 1 tablespoon fresh, coarsely chopped
A few fresh basil leaves per serving, torn
3/4 cup onion, finely chopped
1/2 cup toasted almond slivers
Salt and pepper, to taste
1 tablespoon olive oil

Makes 3 main-dish servings.

Directions:
1. Cook couscous according to package directions.
2. Toss with everything except the basil and almonds.
3. Transfer couscous mixture to plates or a serving platter, and sprinkle with basil leaves and toasted almond slivers - as much or as little as you want.

Cook's Notes: 1) Toasting almond slivers is easy: Toss one-layer's-worth in a dry frying or saute pan and cook over medium heat, stirring frequently, until toasty in color and deliciously aromatic. This doesn't take long. 2) Since I didn't precisely measure the liquids that went into this dish, I would say to start with a little and see how you like it. Of course, if you find that your couscous is a bit too dry, you can add a bit more olive oil and/or juice.
I know - paprika, basil, dill and broccoli - not the most common combination. At the last moment I wondered - what was I thinking? Well, I don't have an answer to that, but somehow this became a delightful combination. Brady hit the nail on the head - it's definitely different, but definitely delicious. The paprika brings a bit of the spice factor while the chickpeas add body and protein, the almonds add crunch and the whole thing is rather herby and delicious.
Couscous in progress. Yumyumyum.
There is probably no way to significantly mess this up. Diced bell peppers would also be delicious in this herb-spice-veggie combination, in addition to or instead of the tomato. It's super easy and also vegan! Everybody wins.

Quote of the Day: Couscous - the food so nice they named it twice. ~ Dale Denton, Pineapple Express (2008)

Tuesday, July 19, 2011

Adventures in Pesto-Making

Despite all the Italian food I ate growing up, pesto seems to have largely passed me by. This is probably because my grandparents were Sicilian, and pesto originated in Genoa, in northern Italy. Still, because of my love for the stuff (and a great affinity for all fresh herbs, really) I thought I might as well give it a shot.

The first surprise in this process, the product of my internet research, is the idea that you really should blanch your basil before making your pesto. I know, it seems crazy to dip those fresh little leaves in boiling water to keep them from turning an icky brown, but that does seem to be the method. Another trick, which may be combined with the blanching or used in isolation, is to float a thin layer of olive oil over the pesto to protect it from the air, and thereby prevent basil oxidation. Knowing that Tuesday is a long day, on which I usually don't get home until 9:15 or so, I made the sauce last night. To my great relief, it was still lovely and green this evening.

The second surprise was - What? Why are pine nuts so expensive? I still don't have an answer to that, but now that I know that a little goes a long way, I am less distressed about it. They bring all the richness and velvety deliciousness to the sauce, so I can forgive them their hefty price tag.

The yield from this recipe doesn't look like much, but for us it was more than enough, so I would call it about three servings. If you want to get all old-timey, or if you just have anger issues, you can definitely use a mortar and pestle instead of a food processor. I recommend toasting your pine nuts first (see Cook's Note), and of course the pasta you will cook according to the package directions:


Ingredients:
3/4 cup fresh basil leaves, lightly packed plus another couple of leaves for serving
1 tablespoon pine nuts, lightly toasted plus a few for serving
2 tablespoons olive oil
3 tablespoons grated Parmesan cheese
1 clove of garlic
1/2 box of whole wheat spaghetti; about 7 oz.

Directions:
To blanch the basil - 
1. Prepare a large bowl of ice water. Bring a pot of water to a boil (large enough that a colander can fit inside).
2. Place basil leaves in boiling water and stir so that they blanch evenly. Leave in water for 15 seconds, then pull colander out and plunge basil into ice water to stop the cooking process.
3. Squeeze excess water from the basil and place in food processor.

To make the pesto:
1. Combine garlic, blanched basil, Parmesan, pine nuts and olive oil in a food processor and blend to a smooth paste, scraping down the sides as needed.
3. Toss with pasta, sprinkling a few toasted pine nuts and a freshly-torn basil leaf or two on top.

Cook's Note: Toast your pine nuts in a dry frying pan over medium-low heat. Stir frequently and keep a close eye on them, as they burn very easily. Remove from heat when fragrant and slightly golden in color.
I had some adorable baby leaves starting on my otherwise listless and garbage-bound basil plant, so I used those instead of tearing up the big, sad-looking ones. So cute, right?
Yum! Not only was this sauce delicious and easy to make, it is very fragrant and quite lovely to look at, too. If you are so inclined, you can add some fresh parsley along with the basil. The only caveat for this recipe is that if you are not a great lover of garlic, you might want to cut it down. Like, by half. Brady was too stuffed up to notice that I was loading him full of garlicky goodness (yay!) and I'm a big fan of the stuff, so we were both happy, but if your sinuses are functional and you are not a garlic-fiend, you could scale it down a bit.

This worked great as a make-ahead, and tonight took only as much time as it takes to cook the pasta. Once perfected with just the right amount of garlic to suit your taste, this will be a great classic dish to have in your repertoire.

Quote of the Day: Pounding fragrant things - particularly garlic, basil, parsley - is a tremendous antidote to depression. [...] Pounding these things produces an alteration in one's being - from sighing with fatigue to inhaling with pleasure. ~ Patience Gray

Sunday, July 17, 2011

Grilled Eggplant Sandwiches with Red Onion, Tomato & Fresh Mozzarella

I have a long-standing distaste for eggplant. As a kid, when I tried my grandmother's eggplant Parmesan, I was shocked. Her ravioli, Italian wedding soup, pasta (which she always called "macaroni) and incredible repertoire of Italian cookies were so delicious, so perfectly crafted through decades of practice, each all fantastic in their own right. But this - this mushy, squishy stuff - people actually liked this? And indeed, like it they did. At age 10 (which was probably the last time I ate eggplant, until tonight) I was so utterly horrified by the texture of the vegetable that I had effectively sworn it off.

But 1) it is eggplant season, 2) in theory we all must grow up eventually, and 3) "eggplant" is my favorite color, so I thought it was time I give them another chance. And Brady, the resident eggplant-parm connoisseur, told me that if I like grilled portobellos, then the texture of eggplant would probably not gross me out anymore. There are many varieties of eggplant, and I was lucky enough to find one of the fanciest-looking ones at my very own grocery store:


 This sandwich, which is somewhat like a Mediterranean veggie burger, combines two to three slices of grilled eggplant with fresh tomato, mozzarella, some thinly sliced red onion with a bit of balsamic vinegar on bakery rolls. The Kaiser rolls we had on hand were slightly over-sized with respect to the circumference of the eggplant, so for high presentation points you probably want to use a globe eggplant and/or smaller buns, or toasted English muffins (why didn't I think of that before?). Likewise, larger balls of mozzarella make for better stacking. My recipe serves two:

Ingredients:
1 eggplant of any variety, sliced crosswise into 1/4 inch-thick rounds
1 large ball of fresh mozzarella, sliced into 1/4 inch-thick slices 
1 slicing tomato, cut into... you guessed it, 1/4 inch-thick slices
1 small red onion, thinly sliced
2 buns or English muffins
Balsamic vinegar
Red or white wine vinegar
Cooking spray
Olive oil
Salt and pepper

Directions:
1. Line a tray or platter with paper towels. Lay the rounds of eggplant on the paper towels in a single layer. Salt generously on both sides and allow to sit while you prepare the other ingredients.*
2. In a shallow dish, combine 1 tablespoon of the balsamic vinegar and 1 tablespoon of red or white wine vinegar, and a sprinkling of salt and pepper. Place sliced onions and tomatoes in the dish and turn to coat.
3. Spray a grill pan with cooking spray and heat it up over high heat.
4. When the eggplant slices have been sitting for at least 15 minutes, pat dry with paper towels and brush on both sides with olive oil. Grill for 3-4 minutes per side. Meanwhile, toast your buns, if desired.
5. To build your sandwich, first lay out your buns. Then stack two to three grilled eggplant slices, adding a slice or two of tomato and some red onion on top. Add a slice or two of fresh mozzarella and top with some fresh basil leaves.

Cook's Note: The salting-over-paper-towels step and general concept for this sandwich came from Elise's Grilled Eggplant Sandwich Recipe on SimplyRecipes.com. Her cooking instructions offer much more direction for using a traditional grill, but they can be easily adapted to grill pans, broilers or George Foreman Grills.
Sandwich construction: Phase 1, where I realize that Kaiser rolls are either too large or too small for this sandwich, and I can't decide which.
So, here's the thing. I can't really claim to be an eggplant convert. I can't say that the texture didn't gross me out a little, or that I didn't wonder what this fancy-looking vegetable was doing with all those thousands of tiny seeds. What I can say is that like many things, I can definitely enjoy it on a "once in a while" basis, or purely as a change of pace from my usual favorite ingredients. It didn't hurt that the other things in this sandwich - the mozzarella, the tomato, basil and red onion - are all among my top-10 favorites.
Still, I really can't hate on this sandwich. It's all the flavors of summer wrapped up in a soft, yummy roll. Get on it!

Quote of the Day: I doubt that the imagination can be suppressed. If you truly eradicated it in a child, he would grow up to be an eggplant. ~ Ursula K. LeGuin

Tuesday, May 17, 2011

Warm Tortellini Salad with Cherry Tomatoes & Other Good Things

This is a very tasty, flavorful meal that takes almost no time at all. If you know you'll be in a hurry you can cut up the tomatoes, onion, and asparagus beforehand, and you've got dinner ready in about 5 minutes.

Ingredients:
9 oz cheese tortellini
1/4 of a red onion, sliced (I chopped mine, for some reason)
1/2 of a 14 oz jar of marinated artichokes, drained
1/2 pint cherry tomatoes, halved
1/2 bunch of asparagus cut into 1 1/2 inch-long-ish pieces (about 1/2 pound)
Fresh parsley or basil, chopped
Salt and pepper
Olive oil
Balsamic vinegar
Apple cider or red wine vinegar

Directions:
1. Cook tortellini according to package directions. Add asparagus to cook for the last minute of the pasta's cooking time.
2. While the pasta is cooking, mix a good drizzle of olive oil and balsamic vinegar with a splash of apple cider or red wine vinegar in a large bowl. Add salt and pepper and other veggies.
3. Drain tortellini and asparagus and add to the dressing and veggie mixture. Turn to coat everything, sprinkle with parsley or basil, and serve.

I used parsley mostly just because I didn't have basil on hand. I think basil, or some combo of the two, would be ideal. To be honest, parsley is just a tiny bit grassy for this dish, but I love fresh herbs of any kind so it didn't bother me at all.

What I didn't add, which I think I should have, is a bit of grated Parmesan cheese right before serving. You could also add some arugula or baby spinach if you were feeling adventurous. Still, this was very tasty, and obviously super easy. I love cold pasta salad, even for dinner, but I think the fresh, warm pasta really makes this dish. The pasta warms the veggies up, but just slightly. This will make a great summer meal. For us, this made two generous servings, though to be honest, we could have made it three, especially if it were served with some crusty garlic bread.

A word to the wise: It's asparagus season! If you're into the stuff, which I sure am, now is the time to get the best flavor at the lowest price. We are about halfway through the season, with a month to go. Steam it, grill it, boil it, whatever you like - just don't miss it!

Quote of the Day: "Life is a combination of magic and pasta." ~ Federico Fellini