Showing posts with label Cheap Thrills. Show all posts

Saturday, October 22, 2011

Crocktober: Vegan Sweet Potato and Pinto Bean Chili

After an unexpectedly long shift at my retail job this evening, I'm feeling a little short on poetic banter, but that doesn't mean that this recipe isn't a good one. The spice factor is totally up to you, but personally I'm a bit heavy-handed with them, so my three teaspoons of chili powder were probably more like "heaping teaspoons." Do whatever makes you happy.
Ingredients:
1 cup dry pinto beans (2 1/2 cups prepared)
1 large sweet potato or yam, peeled and cut into 1/2-inch-ish cubed 
1 cup water
1/2 onion, chopped
1 14.5 oz can diced tomatoes with jalapenos
2 tsp orange or tangerine zest
3 tsp chili powder
1/4 tsp paprika
1/4 tsp cayenne pepper (optional)
Pinch ground allspice (optional)
Fresh cilantro leaves, torn, for serving 
Salt and pepper, to taste (I used about 1/2 tsp seasoned salt)
Cooking spray

Directions:
1. If you're using dry beans, sort, rinse, and soak them in the refrigerator overnight (or for up to 24 hours) in plenty of water. Change the water at least twice in this time. If you are using canned or pre-cooked beans, just skip this step and rinse them well just before you add them to the crock.
2. Combine everything but the cilantro in a sprayed crock, and cook on low for 7-9 hours or high for 4-5. Serve with some fresh cilantro on top.

Easy peasy. I don't have a zester (or a grater, for that matter) so I used a vegetable peeler to peel off just the outer skin of my tangerine (no white stuff!) and minced it, which I think worked just fine.
 The only significant thing I would change about this is to alter the bean-to-potato ratio by adding another sweet potato. In my 2 qt machine another sweet potato wouldn't have fit, but in a larger crock it would. As a technical thing, I might add the sweet potatoes a couple of hours into the cooking time, in the future. Even with dry beans that had been soaking for about 20 hours, the sweet potato was done well before the beans were. I also think this would be yummy with butternut squash instead of the sweet potato.

If you're not bound to the "vegan" thing, this would be yummy with some grated cheese on top.

Quote of the Day: Said Aristotle unto Plato, "Have another sweet potato?,"Said Plato unto Aristotle, "Thank you, I prefer the bottle." ~ Owen Wister (1860-1938), American novelist

Tuesday, August 16, 2011

3-Step Baked Quinoa "Mac" & Cheese from Vegetarian Times

If there is a person alive who does not like macaroni and cheese, I hope never to meet them, because we would not be friends. I mean real rich-and-slightly-brown-on-top macaroni and cheese, not that weird gloopy chemical soup that tries to pass for macaroni and cheese. In my opinion, this quinoa mac and cheese is much closer to the "real" thing in its relative deliciousness than that runny, goopy, neon-orange tragedy. This baked cheesy quinoa is seriously nutritious besides being delicious, hearty and easy. Obviously cheese is not without it's nutritional downside (fat, duh) but the fiber and protein of the quinoa combined with the fiber and other good stuff in the veggies make up for that. In my imagination. Either way, it is a delicious and fairly balanced meal, and a great gluten-free alternative to mac and cheese. This recipe has the makings of serious comfort food.

The basis for this recipe came from VegetarianTimes.com, and I haven't changed it much, except to pare it down from a 9"x13" dish because 1) I love leftovers, but not that much and 2) My baking dish is 8"x8". If you're cooking for a crowd or only have a 9"x13" on hand, I'd just use the original. This will make about 4 meal-sized servings. If you're in my solo-dwelling position, you might want to cut it down further, but since I am a fan of the leftovers, I didn't.

Ingredients:
1 cup quinoa, rinsed thoroughly
1/2 green bell pepper, diced
1/2 red bell pepper, diced
1 1/2 cups cheddar cheese, grated (or a blend) plus more for sprinkling
1/4 large onion, chopped, or 1 medium leek, white and pale green parts halved and sliced
2 cloves garlic, minced
Salt and pepper
1 cup milk
2 eggs

Spices for sprinkling - I used about 1/4 tsp paprika and 1/2 tsp cumin

Directions:
1. In a medium saucepan, heat about 2 tablespoons of olive oil over medium heat. Add onion (or leek) and bell pepper, and saute for about 5 minutes, until tender. Stir in garlic and quinoa and cook for about 3-4 minutes, or until quinoa turns opaque.
2. Add 1 1/2 cups water, and add salt and pepper. Cover, turn heat down to medium-low, and simmer for another 3-4 minutes or until most of the liquid is absorbed. Remove from heat and let stand for 5 minutes.
3. Preheat oven to 350 degrees Fahrenheit. Coat the inside of an 8"x8" baking dish with cooking spray.Whisk together eggs and milk in a large bowl. Add in quinoa mixture and cheese. Transfer to baking dish, sprinkle with spices and cheese and bake for 30-35 minutes, or until edges and top are browned.

It will seem impossibly soupy going into the oven, but it will not come out that way! Mine wasn't getting quite browned enough for my taste so I ran it under the broiler for a couple of minutes at the end. Just be sure to let it sit for a reasonable amount of time before cutting into it. I have a tendency to skip this step and burn my face in my impatience. Don't be like me.

I used a mild white cheddar, but I see no reason why you couldn't use Swiss, or a blend of your favorites, if that's what's hanging around in your refrigerator. I also used soy milk instead of the regular type. I doubt this had much impact on the flavor, but you'll definitely want to check out the ingredients on your soy milk to make sure it's not sweetened, if you decide to go this route. If you are inclined to use an egg substitute and dairy-free cheese, this can definitely be made vegan-friendly.* Vegan or not, I expect that you could add almost any fresh veggies that you wanted. Peas and broccoli would probably be good choices. I had mine with ketchup and hot sauce.
This held together much better than I was expecting, but was also plenty moist.
And, since I can't seem to make a post without sheepishly admitting something weird that I did in the cooking process, this evening my admission is this: I forgot to get myself a cheese grater after the move, so instead of grating the cheese I slivered it into skinny little pieces as best I could. This doesn't much matter except for the fact that if you are measuring your cheese in volume, slivered cheese will take up a lot less space than grated, which is why I included the measurement in ounces for anyone else in my position of graterlessness.

Quote of the Day: How can anyone govern a nation that has two hundred and forty-six different kinds of cheese? ~ Charles de Gaulle

*Of course, what and how you eat is totally an individual decision, but many vegan cheeses (not so unlike many of the cheapest "regular" cheeses) are made mostly of soybean oil and palm oil combined with thickeners. I'm not hating, just recommending as always that everybody read their labels. Do yourself a favor on all fronts and use all-natural cheese!

Thursday, August 11, 2011

Crock Pot Southwestern Three-Bean Stew with Delicious Toppings

It's been said a million times before, but I'll say it again for good measure: Slow cookers are are a busy person's best friend. With a teeny bit of planning and an idea or two, you can have dinner hot and ready for you when you come in the door at night. Though the charming Stephanie O'Dea (better known as the Crock Pot Lady of Crockpot 365) has found a way to cook nearly anything you can think of in her slow cookers, and I do love her recipes, I still think there are a few things that are especially good when cooked all day long, and both beans and stews are on this list.
This stew has pinto beans, chickpeas and 2 types of lentils, but black beans, navy beans, black eyed peas or almost any other bean would also be delicious.
This seems like a ton of ingredients, but if you keep yourself stocked in spices, the odds are pretty good that you will have just about everything on hand. Also keep in mind that you can buy "bean soup mixes" of assorted beans, so my measurements on the bean front might be totally irrelevant. All the better (and easier) for you! So this is totally open to adaptation. I also ended up adding some red pepper flakes at the very end because I was afraid of throwing in too much cayenne earlier in the day. And there's always Sriracha!

For this recipe you will need a 2 or 3 qt crock pot, and some understanding of how it cooks. Some machines will need slightly more or less liquid for a similar effect based on temperature and the fit of the lid, but I would say as long as you've used yours a few times, you should have a good sense of this. This recipe seems to make about 3 servings.

Ingredients:
1/4 cup dry chickpeas
1/4 cup dry pinto beans
1/4 cup brown lentils
1/4 cup red lentils
1 medium red potato, cubed-ish
1/2 tsp cumin
1/2 tsp taco seasoning, or 1/4 tsp chili powder
1/2 tsp salt, seasoned or regular
1/4 tsp cayenne pepper
1/4 tsp paprika
1 envelope Saizon seasoning, cilantro and anchiote, made by Goya
1 clove garlic, smashed
1 jalapeno, diced and seeded
1 1/2 cups water or vegetable broth (subject to the behavior of your machine)
Cheese for topping (optional, but I used Monterrey jack)
1 green onion, thinly sliced
Fresh cilantro, to taste, torn
Tortilla chips (optional)

Directions:
1. The Day Before: Rinse, and soak beans in refrigerator, allowing plenty of room for them to expand (about 30% more space) and covering with at least two inches of water. Soak for 12-24 hours, changing the water at least twice in this period.
2. Place beans, spices, jalapeno, potato, garlic, and water or broth in the crock pot, and cook on "low" for about 9 hours. 
3. When beans are tender, serve and top with green onion, cheese and cilantro. Bonus points if you also serve tortilla chips for scooping.


The whole point of the crock pot is that you don't have to be home to check on it, but if you are, checking once in the afternoon will give you a better sense of how long it will really take. You can bump it up to "high" for a brief period if you need to, since most machines estimate that 1 hour on high is about equivalent to 2 1/2 hours on low. Handy! Though I don't recommend cooking it on "high" the whole time, since everything will get a bit mushy.

My verdict on this is "Good," but to me not great, since I think it could have used a bit more spice, but this is easily remedied. Use your favorite spices or try new ones, but if you ask me, the cheese and cilantro are crucial. Try this soup with some sliced avocado on top. Yum!

Quote of the Day: Society is like a stew. If you don't stir it up every once in a while then a layer of scum floats to the top. ~ Edward Abbey

Wednesday, August 10, 2011

15-Minute Penne with Tuna, Tomato & Black Olives

This dish wins in a lot of ways: It's nutritious, yummy, and super fast. Basically, the only downside is that it's way too much food for one person, which I guess isn't really a downside in and of itself. While leftover pasta never quite lives up to its former glory, I think this will make a very tasty lunch tomorrow.
Eating at my desk like the classy lassie that I am.
 I know some people aren't the biggest fans of black olives, and I can understand this. I hated them as a kid (except for when I was allowed to wear them on my fingers) and even now they are an occasional thing for me, but I feel like they really belong in this dish. If you're still not buying it, you can substitute for any other dark sort of olive, like kalamata, if you prefer. And if you still need convincing, I say this: They're good for you! No, seriously. Olives (which are technically fruits... weird) contain anti-inflammatory, anti-oxidant and anti-cancerous phytonutrients. So maybe give them another chance?

Ingredients:
1 cup (or to taste) sliced black olives 
1 can diced tomatoes (I used "Italian herbs," but you can use plain or another herby variety)
1 can solid white albacore tuna, drained
1 1/2 cups penne pasta
1 clove garlic, peeled and smashed
Salt and pepper
Olive oil
3ish sprigs of fresh parsley
Grated Parmesan cheese (optional)

Directions:
1. Cook your pasta according to the package directions.
2. Meanwhile, heat about 2 tablespoons of olive oil and the garlic over medium heat and cook for about 2-3 minutes. Add tomato, olives, tuna (breaking it apart), and a little salt and pepper. Cook over medium-low heat for about 5 minutes, or until the pasta is done, whichever comes first.
3. Drain your pasta, then add the tomato mixture to the pasta and toss.
4. Transfer the pasta to a bowl or serving dish, and garnish with parsley. Serve with grated Parmesan, if you like, and enjoy immediately.

I went very simple with the herbs, but you could certainly add some dried oregano and/or basil to the tomato mixture, or garnish with other fresh herbs in place of or in addition to the parsley. This dish feels "real" - yummy, but healthy and hearty - and is very easy at the end of a long day.

Obviously I tore up the parsley about twelve seconds later, but it looked pretty there for a sec, right? Also that is my 21st birthday happening in the background, in case you were wondering.


Quote of the Day: Except the vine, there is no plant which bears a fruit of as great importance as the olive. ~ Pliny the Elder

Tuesday, July 12, 2011

Veggie Week: Greekish Chickpea Pockets

With a retail shift in the morning followed by 6 hours of class, Tuesdays are pretty killer. But now I have one more tasty, healthy meal to add to my I-know-I'll-be-too-tired-to-cook-when-I-get-home arsenal, and it's these tasty pita pockets. I made the filling last night, and I am super grateful for that teeny bit of foresight. Not only was dinner super fast to throw together, but I think sitting in the fridge overnight improved the flavor.


I didn't change the recipe enough to claim any significant contribution, so I'll let the link speak for itself. I used whole wheat pitas, and I think I used a bit more mayo, but that is all a matter of taste. Of course, plain Greek yogurt would also be a good "glue" for this chickpea salad. I served mine with some fresh (local!) Romaine, and sliced tomato tucked in.

Simple, fresh, and vegetarian, these would also make a great pack-along lunch (with filling and pita stored separately of course).

Quote of the Day: And what, Socrates, is the food of the soul? Surely, I said, knowledge is the food of the soul. ~ Plato

Tuesday, May 24, 2011

Last Night's Dinner: Warm Pasta Salad with Tuna & Other Things

It hasn't been very long since I last posted about a pasta salad type of meal, but I find the light-yet-satisfying nature of these dishes perfect for this time of year. They're quick, easy, and also super versatile, and since you can add basically anything you want, you won't get sick of them. Adding a "fancy" salad ingredient like marinated peppers, artichokes, or kalamata olives will make your version seem much more sophisticated than the actual effort that went into it. Which is always nice.

For this one I tossed together:
1/2 box of whole wheat Rotini, about 7 oz
2 cans of tuna, packed in water, drained
1 green onion, cut on the bias
3 pepperoncini, thinly sliced (medium-hot peppers, sometimes called Tuscan peppers)
handful or two of chopped asparagus
a few marinated artichoke hearts
salt and pepper
olive oil
balsamic vinegar

Directions:
1. Cook the pasta according to package directions. Add the asparagus for the last minute of cooking time, then drain.
2. In a large bowl, combine about a tablespoon of olive oil, a drizzle of juice (vinegar) from the pepperoncini jar (or regular vinegar if not using peppers), salt and pepper. Add tuna, and break it up.
3. Add pasta, asparagus, and remaining ingredients to bowl and toss until completely coated with dressing. Add more oil and/or vinegar if needed.

Instead of the pepperoncini you can use their less spicy cousins, banana peppers, or even marinated bell peppers if you prefer. Personally I'm all about spicy food lately, so I was more than a little bit excited about the peppers. I ate two of them whole - seeds and all - while I was preparing dinner, which caused Brady a little bit of shock and horror. It was worth it. 

I didn't actually think about adding balsamic vinegar until we were ready to eat, so I just served it alongside. It worked out fine, but I think the flavor would be better dispersed if it were combined with the other dressing ingredients from the beginning. The sweet tartness of the vinegar is a nice contrast with the mildness of the tuna. This is something that Italians have known... possibly forever. In the opinion of the Food Network, this is what an Italian tuna salad is, but in my experience it is something too delicious to describe. But I'll try anyway. In another post, someday.

Wednesday, May 18, 2011

Quinoa with Sauteed Spinach & A Fried Egg on Top

Tomorrow is a 5:00 alarm day, so tonight's post is kind of a short one, but that's fitting for this recipe. It's simple, easy, and one of the quickest dinners I've come up with so far.

I'm not really sure where the idea for this dish came from, which might be obvious by the seemingly random nature of it. But I promise - it's tasty! And as a bonus, it's vegetarian and super nutritious, with lots of iron, protein, and fiber.

...But photogenic, it is not.
 This recipe serves two:

Ingredients:
2 eggs
1/2 cup quinoa, rinsed in a mesh strainer
1/2 onion, chopped
1 bunch spinach, washed
1 clove garlic, thinly sliced
Grated Parmesan cheese
Pat of butter
Olive oil
Salt and Pepper

Directions:
1. In a small pan, boil about 2 cups of water, and add quinoa. Bring back to a boil, then simmer until water is gone.
2. In a large skillet, saute onions in olive oil (about 1 1/2 turns of the pan) until they start to become translucent. Add the garlic and saute another two or three minutes.
3. Start heating up a frying pan, melting a small pat of butter.
4. Add spinach to the garlic and onion, add about a tablespoon of water, and cover. Cook until spinach is fully wilted. Add cooked quinoa and salt and pepper, and saute with spinach for one or two minutes, or until combined.
5. In the frying pan, crack and fry an egg - one per serving, up to 3 - and cook them according to your preference. To serve, just plate the quinoa, place an egg on top, and sprinkle it with a little Parmesan.

Since I have half of a bunch of asparagus left from last night's dinner, I was tempted to add that. I didn't but you definitely could add some, chopped up, with your spinach. Sliced yellow squash would also be good, and would add another pop of color to the plate. This dish is tasty with hot sauce on the egg, if you're into that.

Sunday, May 15, 2011

Veggie Stir-Fry with Chicken & Brown Rice

I've shared this idea before, but it has everything to do with this post, so I'm sharing it again:
As a kid, I used to watch The Frugal Gourmet on TV with my Dad fairly often. I recently read a quote from the chef on the show, Jeff Smith: “Please understand the reason why Chinese vegetables taste so good. It is simple. The Chinese do not cook them, they just threaten them!"
When it comes to anything Asian-ish that involves vegetables, this seems to be the key. Even with Indian dishes like vegetable curry, I find the more al dente versions much more satisfying. So tonight I tried to keep this in mind while I was putting together a super-tasty stir fry.

Of course, the sauce is also of huge importance to the success of your stir fry, so you could say that I sort of cheated. I used a couple tablespoons of plum dipping sauce that I had left over from these fabulous baked egg rolls that I made last week. (I know, there's lots of sugar in it, but I'm careful with sugar so I'm okay with that). I added a drizzle of soy sauce, a little sesame oil, and a tiny splash each of apple cider vinegar and hot chili oil. To thin it out just a tad, I added a splash of water (just a second under the tap) and about 1/2 teaspoon of cornstarch. I know, I just said I was trying to thin it out - but the cornstarch will let the sauce evenly coat your veggies before thickening back up into a delicious sauce. Since I didn't really "make" the sauce, I'll leave that bit up to you, and focus on the yummy veggies. We had ours with brown rice, which you'll cook according to the package directions.

Ingredients:
3 carrots, peeled and cut on the bias
3 stalks of celery, cut on the bias
1 green or red pepper, or some of each, sliced
1 handful bean sprouts
1/2 onion, sliced
2 cloves garlic, smashed
1-2 boneless, skinless chicken breasts, cut into strips (ours came from an extremely well-endowed chicken, so I used just one)

sesame oil
olive oil

Directions:
1. Heat sesame oil, olive oil and garlic until it just starts to crackle. Add chicken and saute until just cooked through, about 5 minutes. Set chicken pieces aside and cover, leaving juices in the pan.
2. Add chopped vegetables, except for the sprouts. Over medium heat, stir-fry the veggies for about 4-5 minutes, or until JUST tender. Test a piece of carrot if you're not sure.
3. Add stir-fry sauce to the veggies, mix in the sprouts, and cook for about one more minute, or just long enough for the sauce to thicken a bit.
4. On each plate, add a scoop of brown rice, and put veggies on top. Then add the chicken, and drizzle remaining hot stir-fry sauce over it. Dinnertime!


You could use shrimp or sliced pork tenderloin instead of chicken, or make it vegetarian by skipping the meat and adding a handful of cashews to your veggies while they're cooking. To be honest, I was surprised at just how juicy the chicken was. In this case I think the sesame oil is the key to keeping thinly-sliced chicken moist and tasty.

Stir-fry is a staple quick, easy, and relatively healthy dinner. With brown rice, you have everything you need. Yes, as a student I have considered making stir-fry veggies with a side of Ramen noodles in the past, but when the cost-per-serving of brown rice is so low, I can't justify all the empty white carbs that Ramen brings to the table. (Get it?) ... (Sorry.)

My only real regret is that I didn't have any ginger, fresh or dry, on hand to add to the sauce. I definitely recommend adding about 1 tsp fresh grated ginger root for a little kick. We both added a little Sriracha at the table.

Quote of the Day: "This country isn't a melting pot. Think of this country as a stir fry. That's what this country should be. A place where people are appreciated for who they are." ~ Jane Elliott 

Thursday, May 5, 2011

Tuna Cakes & Baby Greens Salad

This recipe, which is from Web MD of all places, calls these tasty morsels "tuna patties." But for some reason I have always hated the word patty, so these will be called tuna cakes. At least by me.

My only grievance with this original recipe is its estimated portion size. Serves two, two cakes each, with one can of tuna? Please. I doubled this for the two of us, and it was still a very satisfying but sensibly sized meal. For me it made 8 cakes, we each had 3, and there were 2 left for some lucky person's lunch tomorrow.

This is another "get your hands in there" recipe. Mix it with your hands before making the patties, and its an even faster, easier meal to put together. Also, it is no mistake that this is the first recipe under Web MD's "cheap and easy" section. It is certainly both of those things, but it is also delicious and nutritious. (The new label for low-cost dishes is "Cheap Thrills").

I used dry whole wheat breadcrumbs instead of Panko breadcrumbs, and I didn't have any plain Italian salad dressing so I just used olive oil, vinegar, salt, pepper and a pinch of garlic powder.

Just started cooking. That weird green thing on the bottom left is an oddly large piece of pickle, from the relish.
In a hurry? You can make these ahead of time, layer them in a plastic container with wax paper and cook them when you get home from work. Or class. Or wherever you were. I also recommend cooking more than you know you will need, and eating two or three for lunch the next day in a whole-wheat pita with a mixture of Sriracha and either light mayonnaise or tartar sauce. Tartar sauce is preferable, if you have it on hand. This is a highly portable meal and/or snack.
Tuna cakes with baby greens salad
I served these with some baby spinach greens drizzled with light Caesar dressing, and some chopped radishes.

Quote of the Day: "I brought you a tuna sandwich. They say it's brain food. I guess it's because there's so much dolphin in it, and you know how smart they are." ~ Marge Simpson

[Note: This recipe was made with dolphin-safe tuna!]

Monday, May 2, 2011

Whole-Wheat Shells with Walnuts & Goat Cheese

This dish had me at "walnuts."

In short, this recipe is quick, easy, delicious, (mostly) healthy, and deceptively sophisticated. And did I mention economical? A big "thank you" to Good Housekeeping for this one.


This recipe can be adjusted for the number of people you're serving just by punching in the number, a feature I am generally much too impressed by. The numbers below are for 4 people. I roughly halved these for Brady and I, but things started to turn into weird fractions, so I kinda eyeballed everything.

Ingredients:
Salt & Pepper
1/3 cups walnuts, chopped
1 large clove garlic, chopped
2/3 tbs. olive oil, or about 1 1/2 turns of the pan
2/3 box of medium whole-wheat pasta shells
2/3 pounds frozen peas
4 ounces goat cheese, softened

Directions: 
1. Heat covered 6-quart pot of water to boiling on high. Add 2 teaspoons salt. 

2. In an 8- to 10-inch skillet, combine walnuts, garlic, and oil. Cook on medium until golden and fragrant, stirring occasionally. Stir in 1/8 teaspoon each salt and freshly ground black pepper. 

3. Add pasta to boiling water in pot. Cook 1 minute less than minimum time that label directs, stirring occasionally. Add peas; cook 1 minute longer. Reserve 1 cup pasta cooking water. Drain pasta and peas; return to pot.

4. Add goat cheese, 1/2 cup cooking water, 1/4 teaspoon salt, and 1/2 teaspoon freshly ground black pepper. If mixture is dry, toss with additional cooking water. To serve, top with garlic-and-walnut mixture.

The garlic and walnuts gave this a really rich, nutty flavor and the goat cheese became a creamy, effortless sauce that wasn't overwhelming or heavy. You could definitely use a flavored goat cheese, like garlic & herb, but I used plain. The peas are definitely a must for color. Yum!

Quote of the Day: A piece of spaghetti or a military unit can only be led from the front end. ~ George S. Patton

Friday, April 29, 2011

Odds-And-Ends Salad with Chickpeas & Other Good Things

Yesterday was another marathon day, but since today was my "day off" (full of laundry, reading, homework, and all of that other fun stuff) I took the opportunity to sleep in a bit. I always think that I will enjoy sleeping late  - if you can call 9:15 late - but the older I get the more I find that it totally disrupts my sense of what time it is, what day it is, even what I want to eat that day.

But by about 12 pm, I was starving. Honestly, I probably would have eaten anything.

Rummaging around in the vegetable drawer, I found about a cup of cooked (from dry!) chickpeas, half a zucchini, a big tomato, some fresh parsley and green onion. I almost added red grapes, but decided against it. With some feta that I had honestly forgotten was there (apparently it keeps until October?), oil, balsamic vinegar, salt and pepper, and a few baby spinach greens, this was a pretty tasty lunch. Much better than the "anything" I would have settled for.


Quote of the Day: “Life expectancy would grow by leaps and bounds if green vegetables smelled as good as bacon.” ~ Doug Larson

Friday, April 22, 2011

Crock Pot Falafel from Crockpot 365

I have Stephanie O'Dea, better known in some circles as The Crockpot Lady, to thank for many of my favorite go-to recipes. Between her adventurous cooking and frank reporting, her blog is pretty great.

And in my opinion, one of her best - and most surprising - recipes is falafel that you cook in your crock pot.*
 _________________________________________
 Stephanie's Recipe:
Ingredients
1 15oz can garbanzo beans (chick peas)
- 1/2 onion, chopped
-1 T dried parsley
- 2 cloves minced garlic
- 1 egg
- 1 t kosher salt
- 1/4 t black pepper
- 2 t ground cumin
- 1 t ground coriander
- 1/4 t cayenne pepper
- juice from 1 lemon 
- 1/2 to 3/4 cup bread crumbs 
- 2 T olive oil (for the bottom of your crock)
Directions
Drain garbanzo beans. Dump them into a mixing bowl and smash them with a fork. Set aside.

Get out your blender or food processor. Blend together all of the spices, the onion, the garlic, the egg, and the lemon juice.

Pour on top of your smashed garbanzo beans. Use your fork to mix together, and add the breadcrumbs slowly until the mixture is wet and sticky but can be formed into balls nicely. I needed 3/4 of a cup of breadcrumbs.

Pour 2 T of olive oil into the bottom of your crock pot stoneware insert.

Form squished golf-ball sized patties of falafel. Dip each side into the olive oil and then nestle into your crockpot. It's okay if they overlap or are on top of each other.

Cook on high for 2-5 hours. You will know that the falafels are done when they turn brownish-golden. You can flip them halfway through the cooking time if you feel like it, but they will brown on top even without flipping.
 _________________________________________
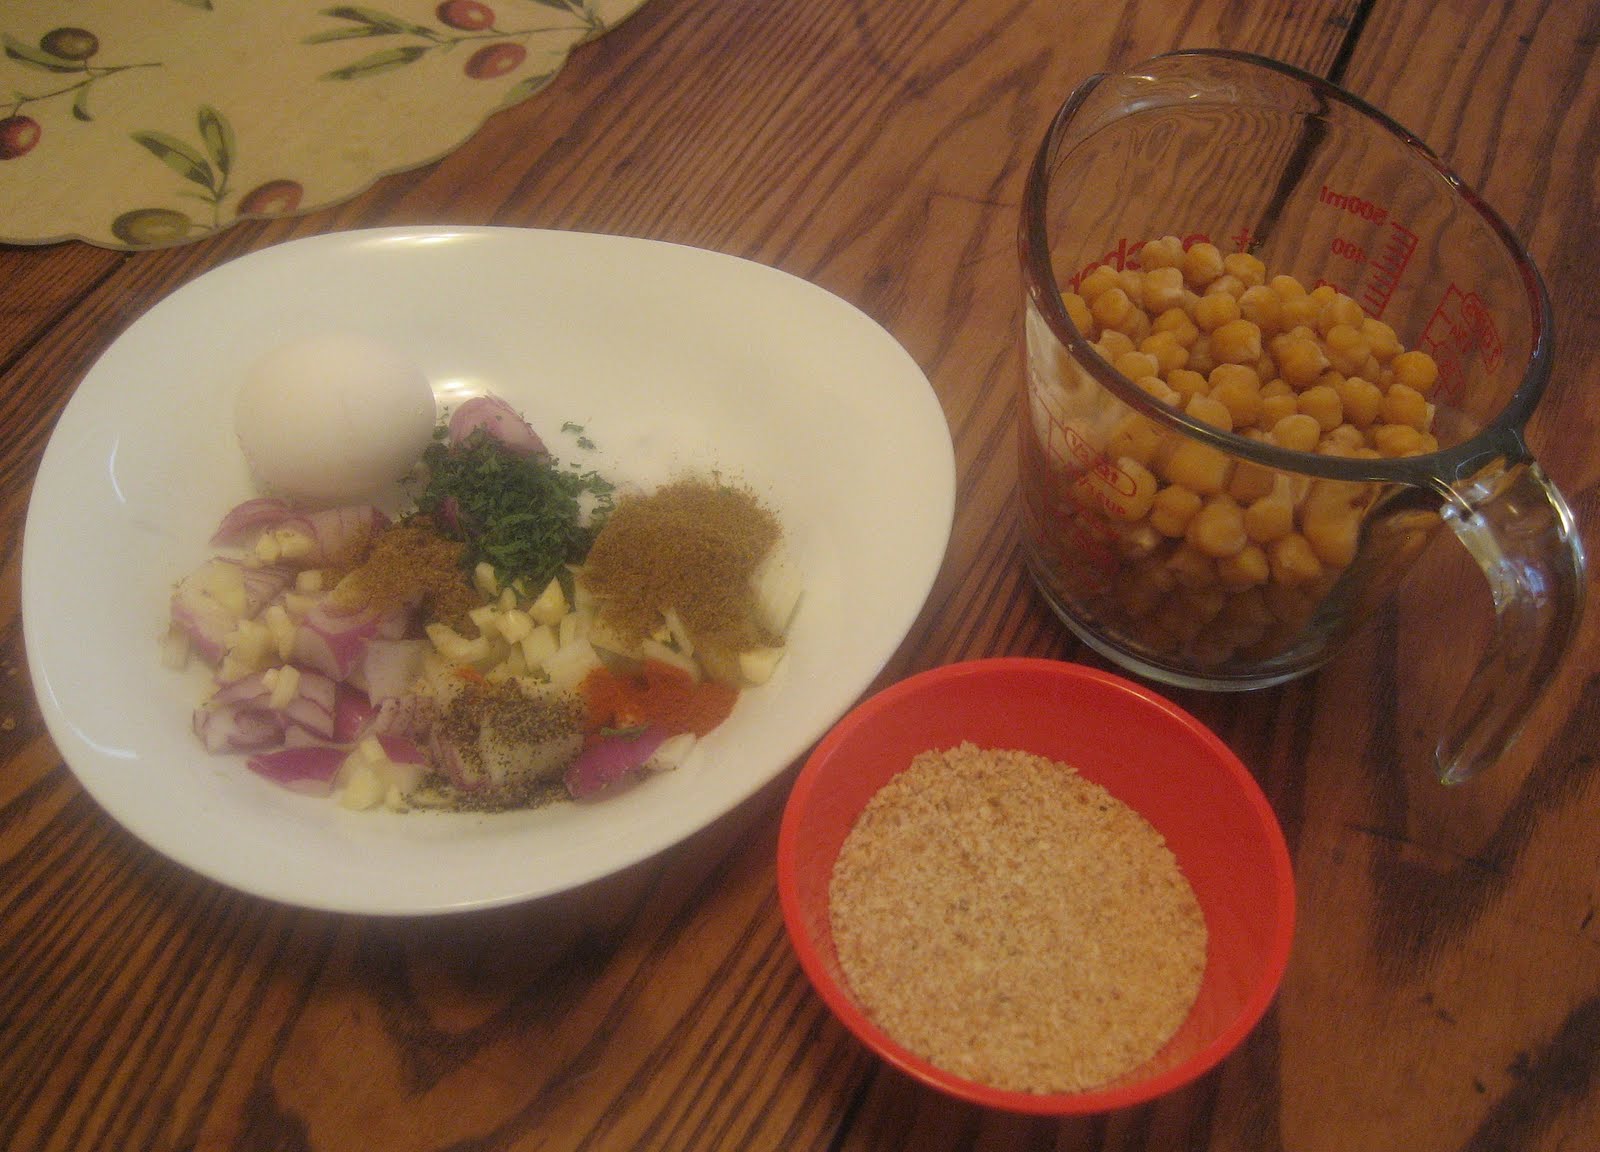
My "mise." Silly little lemon juice container not pictured, because I feel kind of lame about it.

See? EASY. And honestly, out of sheer laziness I sent my chickpeas for a spin in my food processor until chopped instead of mashing them. I still do recommend mixing the ingredients in the order she describes, though. (I just dumped the chickpeas out after chopping and added them back in later). I use a Ninja Master Prep and apart from a somewhat annoying-to-clean lid design, I'm a big fan.
This is one recipe that I follow without messing around with it. Which is a pretty big compliment.

And by "not messing around," I mean that I only changed the following:
- I always cook with dry beans, so I cooked my chickpeas the day before. (Wonderfully, chickpeas don't need to be soaked). The equivalent of a 15 oz can is just under 2 cups of cooked chickpeas. Dry beans are MUCH cheaper by volume, and I hugely prefer soaking and cooking them to wondering exactly what goop my beans are canned in, and why they taste like nickels.

- I used 2 tablespoons of lemon juice instead of a fresh lemon, just because that's what I had on hand.

- Instead of the half onion, I used a bit of white and a bit of red onion, and instead of Kosher salt I used regular, for the same reason as the lemon juice substitution.

Happy little falafels cooking in my 2-quart crock pot.
I served them in wheat pitas with lettuce, tomato, and a quick tzatziki I made with fat free plain yogurt, a little lemon juice, dried dill, and salt and pepper.

Truthfully, I've never had "real" falafel - that is, the deep-fried kind. But, Brady insists that these taste just the same, except obviously not the fried part. Even better!


* If you want to get particular, "CrockPot" is a particular brand of the general appliance variety known as the "slow cooker." I grew up calling them all crock pots, so that's what you get. But whatever you call them, they are magical and fantastic, and definitely NOT just for soup.

Wednesday, April 13, 2011

Last Night's Dinner: Mexican-ish Frittata & HotHot Salsa

Last night I got home from class around 8:45 feeling the way I often do after class: Exhausted, starving, and very tempted to order a pizza. But thankfully I had lined up an easy (though admittedly not as quick as I would like) dinner. I could lament that I was too tired to remember to add the can of diced tomato with green chilies to the frittata, but there would be no point. I think it turned out better the "mistake" way. And anyway, I'm not sure there would have been room!

As much as I am irked by the task of defrosting and (endlessly) straining frozen spinach, I do think it makes a great addition to frittatas. Last night, the concoction included:

1/2 a yellow onion, chopped
1/2 of a green bell pepper, chopped
1 clove of garlic, minced
About a 1/3 cup of zucchini, chopped (it had to be used for something)
10 oz package chopped frozen spinach, thawed and strained. Endlessly.
6 eggs, beaten, with a little water added for fluff and beaten some more
3.5 oz package (two small sausages) of chorizo
Small handful of shredded "Mexican" cheese

In a 10 inch round cast iron pan (or you can use any oven-proof pan) over low heat, I lightly caramelized the onion in olive oil, about two or three turns of the pan worth. Then I added green pepper, zucchini and garlic, and cooked the veggies until they were just barely tender.

Then I added the chorizo to the pan, to cook for another two or three minutes. This is probably around the time that I preheated the oven to 400 degrees.

I find it is easiest to mix the spinach with the egg before adding the egg to the pan. I'm not sure if this is "right," but it works! You just have to work kind of quickly here: Add the egg to the pan, sprinkle in the cheese, and combine to be sure that the cheese, vegetables and spinach are distributed evenly throughout the frittata. 
                          
                                           Before:
This is around the time I realized I forgot about the tomato and chilies.

Then I thought, it's basically salsa already, why not heat it up and reduce it a bit, and have it be a spicyhot-temperaturehot* sauce. Obviously I couldn't resist adding some Sriracha, also. Honestly I wasn't sure, but it turned out to be a good idea! A nice balance of tomato and spicyness brought out the slight heat of the chorizo in the frittata but didn't overwhelm the other flavors. I might actually do this on purpose next time.

The actual cooking of the frittata remains somewhat of a mystery to me, in that I seem to do it differently every time. Generally, though, I leave it on the stove over low heat (so the bottom doesn't burn) for about 5 to 10 minutes, then stick it in the oven until it passes the "run" test. That is, it is done when tipping the pan does not cause an avalanche of goop and runny egg matter. (Sounds delicious, right!?). This usually takes about 10 minutes. Personally I find there to be something remarkably disgusting about even slightly overcooked eggs, so I watch it pretty closely.
  
                                           After:

A nifty thing about many dutch ovens, like the Lodge one that I have, is that the lid can be used as a shallow pan, which is what I used for this dish. It is also great for baking, although my one brush with Pineapple Upside Down Cake was a sticky-sweet disaster. Still, it's a useful thing to have on hand, and I find that I use it much more than I expected I would. Just note that the first few times you cook eggs in it, they will stick no matter what you do, even if it claims to be "seasoned" already. No pain no gain!

A note about cast iron in general: If you own it, don't make yourself crazy reading every article you can find about how to "season" your pans, like I did. The rules are simple. Remove crusty stuff with a metal spatula, DO NOT use dish soap, wipe clean with a lightly-oiled cloth (vegetable oil or, disgustingly, lard is best), and set it over medium/low heat for a few minutes after use. Sometimes a little oil in the pain over medium heat is necessary to dislodge all the crusty bits. If you ABSOLUTELY MUST use dish soap for some reason, stick it on the stove over low heat for 10 minutes to make sure it is completely dry. If you put cast iron in a dishwasher... Just don't do it. The Gods will cry, and so will I.

*My Italian grandmother was famous for the funny way she said "spicyhot!," which my mercilessly hilarious brother used to get her to say at every opportunity. A holiday meal wasn't complete without it.


Quote of the Day: "Love and eggs are best when they are fresh." ~ Russian proverb